Apple Vision Pro is a revolutionary mixed-reality headset that allows you to immerse yourself in a world of virtual environments, games, entertainment, and productivity tools. One of the exciting features of Apple Vision Pro is the ability to share the experience with others. Whether you want to let a friend or colleague explore your virtual space, or share content and activities without compromising privacy, guest user mode offers a seamless and secure way to do so.
Sharing your Apple Vision Pro with a guest user ensures that they can enjoy the features and content without accessing your personal data or settings. This feature is particularly useful when you want others to experience the immersive world of Vision Pro without having to fully set up a separate account. In this guide, we’ll walk you through how to share your Apple Vision Pro with a guest user, ensuring both convenience and privacy.
Steps to Share Apple Vision Pro with a Guest User
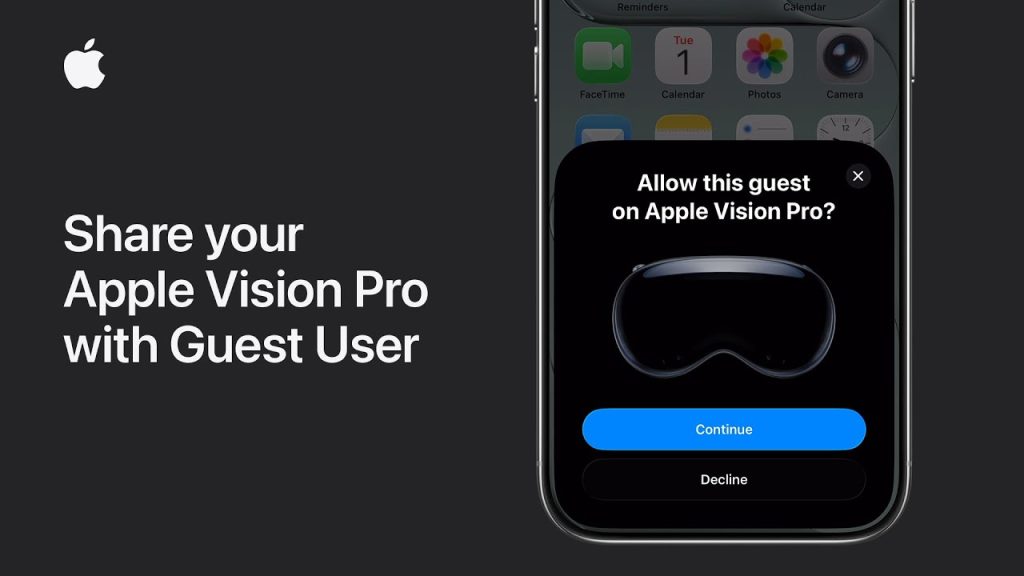
1. Enable Guest User Mode on Apple Vision Pro
Before you can share your Apple Vision Pro with a guest, you need to enable Guest User mode. This allows the device to create a temporary, restricted experience for the guest without altering your personal data or settings.
- Open the Settings App
Put on your Apple Vision Pro and navigate to the Settings app by using the virtual menu. You can do this with voice commands or hand gestures. - Go to User Management
In the Settings menu, scroll down and select User Management. Here, you will find the option to manage your personal account and enable Guest User mode. - Activate Guest User Mode
Toggle the Guest User Mode option on. Once activated, the Vision Pro will allow a guest to use the headset without accessing your personal information, apps, or preferences.
2. Customize Guest User Experience
After enabling Guest User mode, you can customize the experience for your guest. This ensures that they have a seamless experience while using your Apple Vision Pro, without compromising your personal settings.
- Limit Access to Personal Apps
You can choose which apps and features will be available to the guest user. For example, you can allow them to use apps like games or media streaming apps, but restrict access to your private documents, photos, or messages. - Set Temporary Profile Preferences
Customize the guest’s experience by adjusting settings like virtual environments, accessibility options, and visual preferences. This allows your guest to have a comfortable experience tailored to their needs without changing your default settings. - Restrict Sensitive Features
Ensure that sensitive features like voice control, personal documents, and payment options are disabled for the guest user. You can manually disable access to features you don’t want them to interact with.
3. Sharing Content and Virtual Environments with a Guest
Once you’ve set up Guest User mode, you can share content and virtual experiences with your guest, allowing them to enjoy immersive environments without having to make significant adjustments.
- Share Virtual Spaces
If you’ve created custom virtual environments or spaces, you can invite your guest to join them. Use the Share Space option within any collaborative app or environment, and send an invite to the guest. They’ll be able to join your environment and interact with content in real time. - Display Media for Shared Viewing
If you want to share media, like a video or game, you can activate the Media Share feature. This lets your guest view the content on their own screen or in a shared virtual space, providing a collaborative viewing experience. - Collaborate on Projects
For more interactive experiences, such as collaboration on virtual projects or tasks, share your workspace or project environment. This allows the guest to see, interact, and contribute to ongoing tasks or creative activities.
4. Switch Between Personal and Guest Mode
Switching between your personal profile and the guest mode is seamless and easy. This allows you to maintain privacy and control while giving your guest a full experience.
- Switch to Personal Mode
To switch back to your personal mode, simply open the Settings app and go to User Management. Tap on your personal profile to switch back to your settings and apps. - Switch to Guest Mode
To switch to Guest Mode, you can either return to the User Management section and select Guest or use a voice command to activate Guest Mode. - Log Out of Guest Mode
Once the guest is done using the Apple Vision Pro, you can log them out by simply navigating to the User Management section and selecting Logout. This ensures that their session ends, and no personal data is stored on the device.
5. End Guest User Session
Once your guest has finished using the Apple Vision Pro, it’s important to properly end the guest session to ensure privacy and security.
- Sign Out of Guest Mode
Go to Settings > User Management and select Sign Out of Guest Mode to end the session. This will clear any temporary preferences or data associated with the guest user. - Return to Your Personal Account
After signing out of Guest Mode, you can return to your personal profile and continue using the device as usual, with all of your settings and data intact.
Why Sharing Apple Vision Pro with a Guest User is Useful
Sharing your Apple Vision Pro with a guest user is a great way to showcase the device and its capabilities without compromising your personal information. Whether you want to introduce a friend to the immersive world of mixed reality, collaborate on a creative project, or share media in a shared virtual space, Guest User mode makes it easy to create a personalized experience for others while protecting your privacy.
This feature also helps when you have multiple people using the same Apple Vision Pro, such as in a family or business setting. By enabling Guest Mode, you can ensure that each user has their own temporary environment, making the device more versatile and user-friendly.
Final Thoughts on Sharing Apple Vision Pro with a Guest User
Apple Vision Pro’s Guest User mode offers a simple yet effective way to share the immersive experience with others without compromising your privacy. Whether you’re collaborating on a project, enjoying media together, or just allowing someone to experience mixed reality for the first time, this feature ensures that both you and your guest have a seamless and enjoyable experience.


