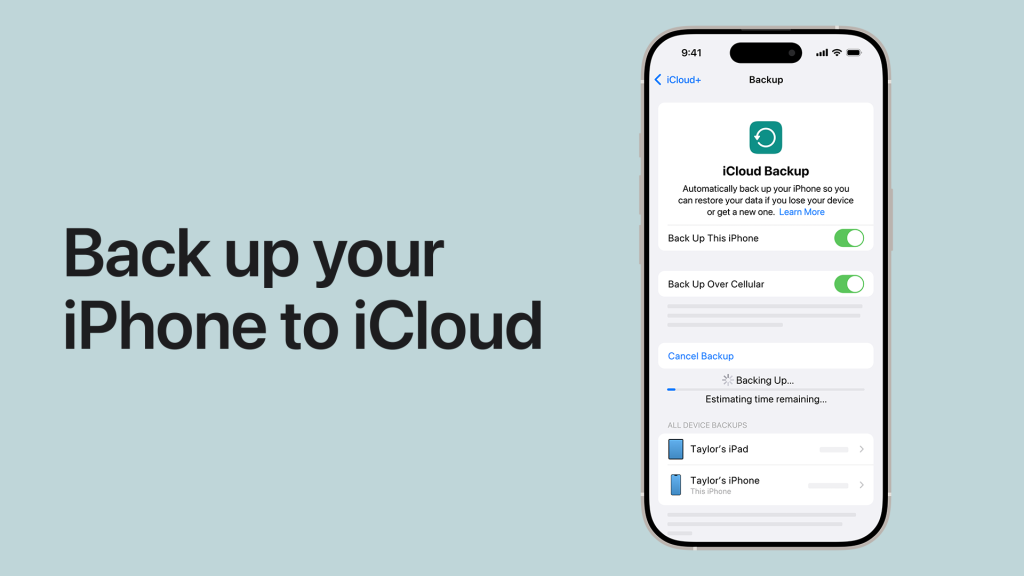
Backing up your iPhone is essential for protecting your data, photos, contacts, and settings. With iCloud, Apple offers a convenient and secure way to back up your iPhone wirelessly, ensuring that you can restore your device or move to a new iPhone without losing important information. Whether you’re upgrading your iPhone or just want to ensure your data is safe, iCloud backup is the easiest and most efficient way to safeguard your information.
In this guide, we’ll walk you through how to back up your iPhone to iCloud, step-by-step, so that you can keep your data safe and ready to restore if necessary.
How to Back Up Your iPhone to iCloud
1. Ensure You Have Enough iCloud Storage
Before you start backing up your iPhone to iCloud, make sure that you have enough available storage in your iCloud account. iCloud offers 5GB of free storage, but you may need more space if you have a lot of data to back up.
- Check Available Storage
- Go to Settings > [Your Name] > iCloud > Manage Storage to check how much storage is available.
- If you’re running low on space, you can upgrade your iCloud storage plan by tapping Change Storage Plan and choosing a plan that fits your needs. You can select between 50GB, 200GB, or 2TB plans.
2. Enable iCloud Backup
Once you’ve confirmed that you have enough storage, the next step is to enable iCloud Backup on your iPhone.
- Open Settings
Open the Settings app on your iPhone. - Tap Your Apple ID
At the top of the Settings menu, tap [Your Name] to access your Apple ID settings. - Go to iCloud Settings
In the Apple ID settings, tap iCloud. - Turn On iCloud Backup
Scroll down and tap iCloud Backup. Toggle the switch to turn on iCloud Backup if it isn’t already enabled. - Confirm iCloud Backup Is On
Once iCloud Backup is enabled, you’ll see the option to back up your iPhone manually. This ensures that your iPhone automatically backs up data when connected to Wi-Fi, plugged into a charger, and locked.
3. Back Up Your iPhone Manually
If you want to perform a manual backup immediately, follow these steps:
- Tap Back Up Now
In Settings > [Your Name] > iCloud > iCloud Backup, tap Back Up Now to start a manual backup. - Wait for the Backup to Complete
The backup process may take several minutes depending on the amount of data on your iPhone and the speed of your internet connection. Ensure your iPhone is connected to Wi-Fi and plugged into a charger during this process. - Verify the Backup
After the backup is complete, you’ll see the date and time of the most recent backup under Last Successful Backup. This confirms that your iPhone data has been backed up to iCloud.
4. Set iCloud Backup to Automatically Back Up Your iPhone
Once iCloud Backup is enabled, your iPhone will automatically back up to iCloud every day when it’s connected to Wi-Fi, plugged into a charger, and locked. This automatic backup ensures that your data is always up to date without you needing to do anything manually.
- Check Automatic Backups
To confirm that your iPhone will automatically back up, go to Settings > [Your Name] > iCloud > iCloud Backup. Ensure that iCloud Backup is turned on. Your iPhone will now back up automatically each day.
5. What Gets Backed Up to iCloud
iCloud Backup saves most of the data and settings on your iPhone, but it doesn’t back up everything. Here’s a list of what gets backed up:
- App Data
Most of your app data will be backed up to iCloud, including game progress, settings, and preferences. - Photos and Videos
Photos and videos from the Photos app are included in the backup, but if you’re using iCloud Photos, your photos may already be stored in iCloud and not take up additional space in the backup. - Messages and iMessages
Text messages, iMessages, and MMS messages will be backed up, including attachments such as photos, videos, and documents. - Contacts, Calendars, and Notes
iCloud automatically syncs your contacts, calendar events, and notes across devices. If you’re using iCloud for these services, they won’t be included in the backup but will sync automatically. - Settings and Home Screen Layout
Your iPhone’s settings, Wi-Fi passwords, Home screen layout, and Apple Watch settings will be backed up to iCloud. - Health and Activity Data
Health and activity data is included in the backup, but only if you’re using iCloud to store this information.
6. Restore Your iPhone from iCloud Backup
If you need to restore your iPhone from an iCloud backup (for example, if you’ve bought a new device or need to reset your current one), follow these steps:
- Erase Your iPhone (If Necessary)
If you need to restore to a new iPhone or factory reset your current one, go to Settings > General > Reset and tap Erase All Content and Settings. This will erase everything on your device, so make sure you’ve backed up your data first. - Set Up Your iPhone
After the iPhone restarts, follow the setup process, including selecting your language and region. - Restore from iCloud Backup
When prompted to Set Up Your iPhone, choose Restore from iCloud Backup. Sign in with your Apple ID, select the most recent backup, and wait for the restoration process to complete. Your apps, settings, and data will be restored from iCloud.
7. Troubleshooting iCloud Backup Issues
If you’re having trouble backing up your iPhone to iCloud, here are a few troubleshooting tips:
- Check iCloud Storage
Ensure you have enough iCloud storage available. To check, go to Settings > [Your Name] > iCloud > Manage Storage. If you’re running low on space, you can upgrade your iCloud storage plan. - Check Wi-Fi Connection
Make sure you’re connected to a stable Wi-Fi network. iCloud backups won’t work over cellular data, so a reliable Wi-Fi connection is necessary. - Ensure iCloud Backup Is Enabled
Go to Settings > [Your Name] > iCloud > iCloud Backup and ensure that iCloud Backup is turned on. If it’s off, turn it on and try backing up again.
Why Backing Up Your iPhone to iCloud Is Important
Backing up your iPhone to iCloud ensures that your important data is safe and can be restored if something happens to your device. Whether you lose your phone, get a new one, or need to reset it, iCloud backup makes the restoration process simple and secure.
Final Thoughts on Backing Up Your iPhone to iCloud
Backing up your iPhone to iCloud is quick, secure, and ensures that your data is safe. By enabling iCloud Backup and following the simple steps outlined in this guide, you can ensure that your data, photos, apps, and settings are always ready to be restored if needed. Regular backups help protect your device and offer peace of mind.