


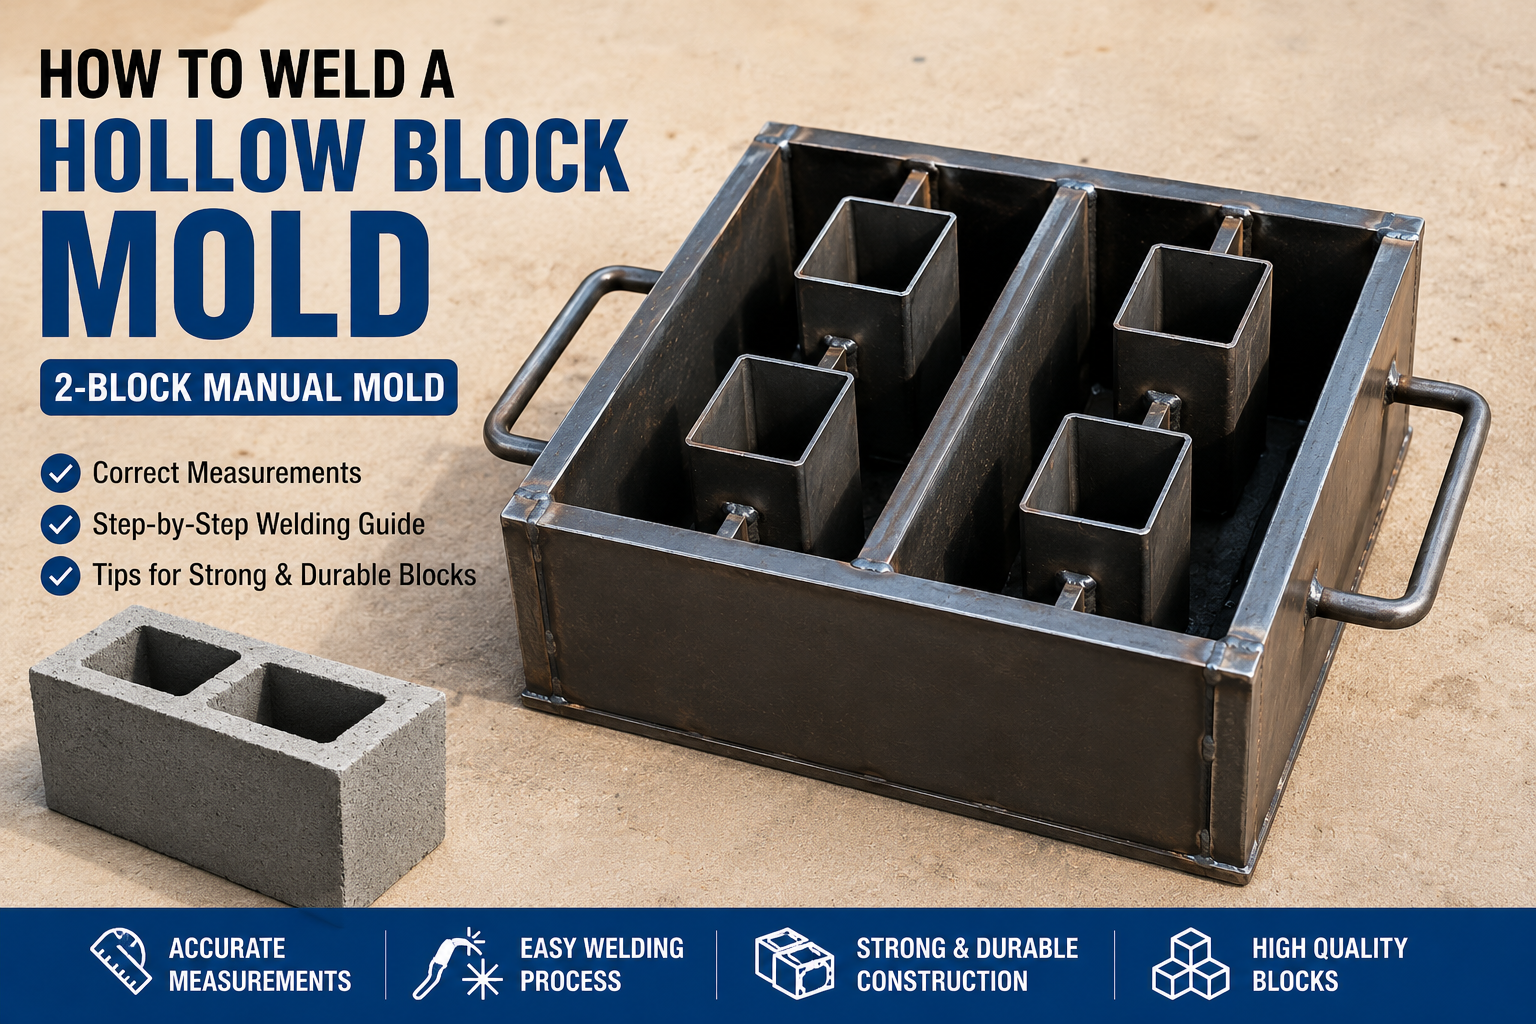
Building a strong hollow block mold is one of the most important steps in producing high-quality concrete blocks for construction. A properly welded mold improves block shape, strength, durability, and production efficiency. Whether you are starting a small block-making business or fabricating tools for personal construction projects, understanding the correct measurements and welding process is essential.
A concrete block, also known as a cinder block in North American English, breeze block in British English, or concrete masonry unit (CMU), or by various other terms, is a standard-size rectangular block used in building construction. The use of blockwork allows structures to be built in the traditional masonry style with layers (or courses) of staggered blocks.
Concrete blocks may be produced with hollow centers (cores) to reduce weight, improve insulation and provide an interconnected void into which concrete can be poured to solidify the entire wall after it is built.
Concrete blocks are some of the most versatile building products available because of the wide variety of appearances that can be achieved using them.
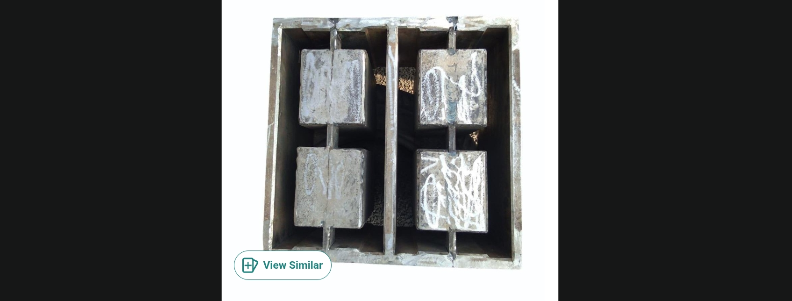
This guide explains how to fabricate a manual 2-block rectangular hollow block mold similar to the one shown above, including steel measurements, welding instructions, mold release techniques, and production tips.
Read Also: Cement Prices in Kenya Guide
What This Hollow Block Mold Produces
The mold is designed to produce:
- 2 hollow blocks at a time
- Standard rectangular concrete blocks
- 2 hollow cavities per block
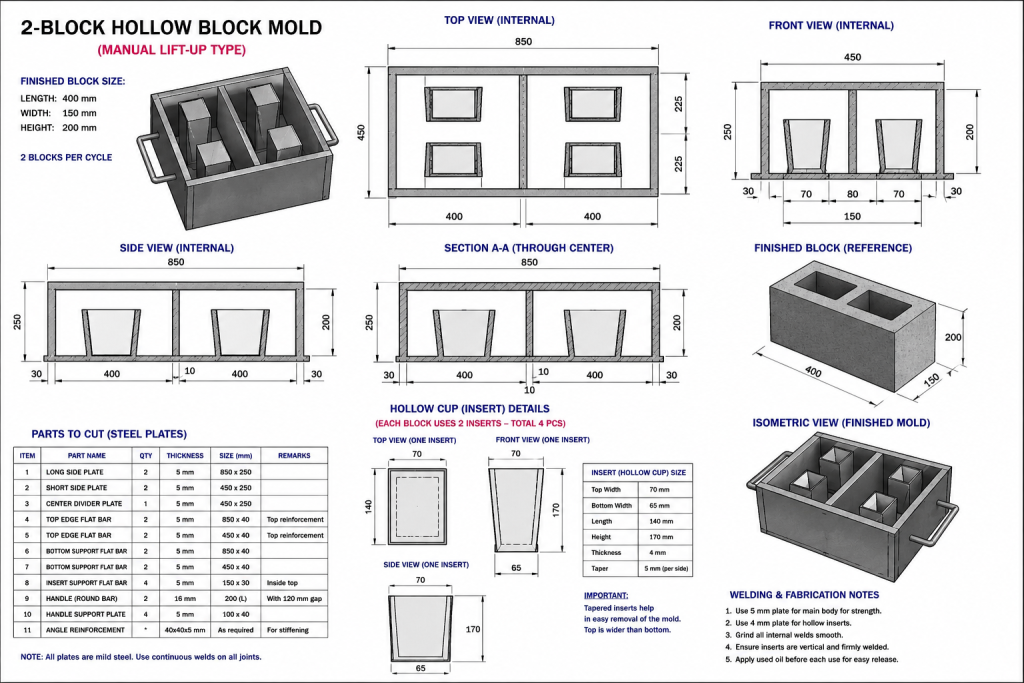
Recommended finished block size:
- Length: 400 mm
- Width: 150 mm
- Height: 200 mm
This type of mold is commonly used in manual concrete block production across many construction projects.
Materials Needed for the Mold
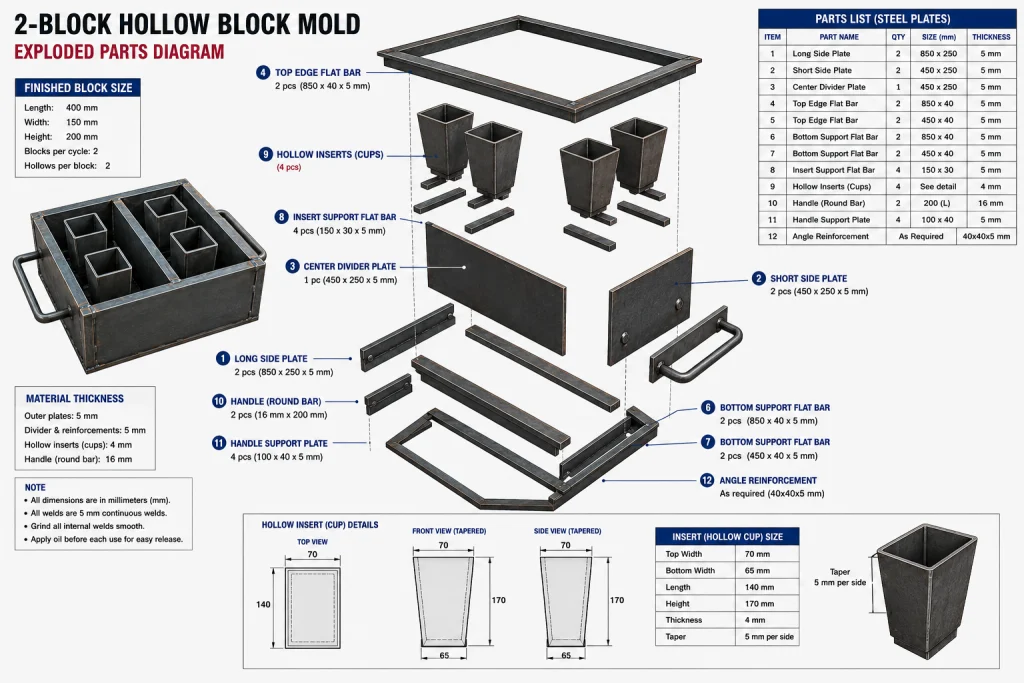
To fabricate a strong and durable mold, use quality steel materials.
Steel Plates
- 5 mm mild steel plate for the outer frame
- 4 mm mild steel plate for hollow inserts
Reinforcement Materials
- 40 mm x 40 mm angle iron
- 30 mm x 5 mm flat bar
- 16 mm round bar for handles
Required Tools to make Hollow Block Mold
- Welding machine
- Grinding machine
- Cutting machine
- Measuring tape
- Steel square
- Clamps
- Hammer
- Marker or chalk
Correct Hollow Block Mold Measurements
Using correct measurements ensures the blocks remain uniform and easy to release.
Outer Frame Measurements
| Part | Measurement |
|---|---|
| Length | 850 mm |
| Width | 450 mm |
| Height | 250 mm |
Internal Block Chamber Measurements
Each chamber should measure:
| Part | Measurement |
|---|---|
| Length | 400 mm |
| Width | 150 mm |
| Height | 200 mm |
The center divider should use:
- 5 mm to 6 mm steel thickness
Hollow Insert Measurements
Each block contains two hollow cavities.
Recommended insert dimensions:
| Part | Measurement |
|---|---|
| Length | 140 mm |
| Width at Top | 70 mm |
| Width at Bottom | 65 mm |
| Height | 170 mm |
The inserts must taper slightly downward to allow smooth release after compaction.
Step-by-Step Guide to Welding the Mold
Step 1: Cut the Steel Plates
Cut all outer frame plates according to the measurements.
You will need:
- 2 long side plates
- 2 short side plates
- center divider plate
- hollow insert plates
Use a cutting machine or grinder for clean and straight cuts.
Step 2: Weld the Outer Frame of the Hollow Block Mold
Arrange the outer plates into a rectangle.
Use a steel square to ensure:
- accurate 90-degree corners
- straight alignment
Start with tack welding before completing full welds.
Once aligned correctly:
- complete continuous welds on all edges.
Step 3: Install the Center Divider
Position the divider at the center of the mold.
This creates the two block chambers.
Weld carefully:
- top,
- bottom,
- and side joints.
Ensure both chambers are equal in size.
Step 4: Fabricate the Hollow Inserts
Use 4 mm steel plates to build the hollow inserts.
Each insert must taper slightly downward.
Example:
- top width = 70 mm
- bottom width = 65 mm
This taper prevents concrete from sticking inside the mold.
Grind all welds smooth after fabrication.
Step 5: Weld the Inserts Into Position
Install:
- 2 inserts per block chamber
Space them evenly.
Leave approximately:
- 30–40 mm concrete wall thickness around the inserts.
Use flat bars or support rods to hold them firmly from above.
Step 6: Reinforce the Mold
Use angle iron around:
- top edges,
- outer walls,
- stress points.
Reinforcement prevents:
- bending,
- cracking,
- warping during compaction.
Step 7: Add Lifting Handles to the Hollow Block Mold
Weld:
- 16 mm round bar handles
on both sides of the mold.
Strong handles help:
- lift the mold evenly,
- release blocks cleanly,
- reduce twisting during lifting.
Step 8: Grind and Smooth the Surfaces
Use a grinding machine to smooth:
- internal walls,
- weld joints,
- insert surfaces.
Smooth steel helps prevent:
- concrete sticking,
- rough block edges,
- mold damage.
How to Use the Hollow Block Mold
Prepare the Mold
Before every use:
- apply used engine oil or mold release oil inside the mold.
Oil:
- outer walls,
- hollow inserts,
- divider plates.
This improves block release.
Prepare the Concrete Mix
Recommended mix ratio:
| Material | Ratio |
|---|---|
| Cement | 1 part |
| Quarry dust or sand | 5–6 parts |
Use very little water.
The mixture should be:
- semi-dry,
- compactable,
- not flowing.
Fill and Compact the Hollow Block Mold
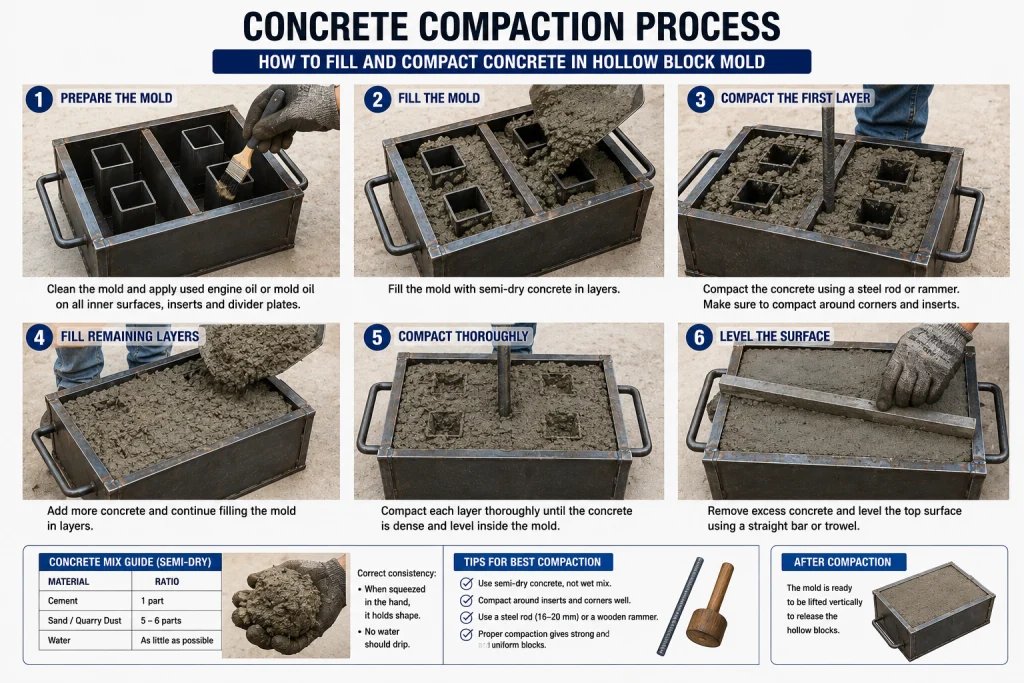
Fill the mold gradually.
Compact using:
- steel rod,
- wooden rammer,
- or vibration.
Pay special attention around:
- corners,
- hollow inserts,
- edges.
Level the Surface
Use:
- flat bar,
- trowel,
- or straight wood
to level the top surface.
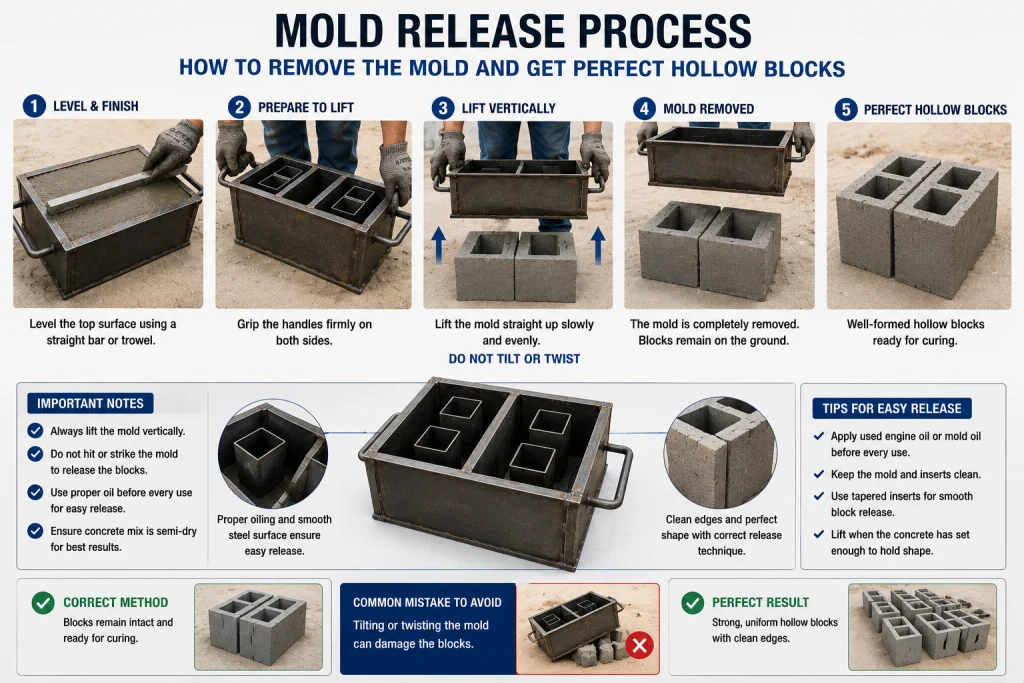
Release the Blocks
Lift the mold slowly upward.
Important:
- lift vertically,
- do not twist or tilt.
The blocks should remain standing on the ground while the mold lifts away.
Common Mistakes to Avoid
Using Wet Concrete
Wet concrete causes:
- sticking,
- weak blocks,
- poor shape retention.
Always use semi-dry concrete.
Straight Hollow Inserts
Straight inserts trap concrete inside the mold.
Always use tapered inserts.
Weak Steel
Thin steel bends quickly during production.
Recommended:
- 5 mm outer plates
- reinforced angle iron frame
Poor Welding
Weak welds eventually crack under pressure.
Use:
- continuous welds,
- reinforced corners,
- proper grinding.
Tips for Better Block Production
For stronger and cleaner blocks:
- add a vibration motor,
- use a compression lid,
- keep the mold clean after every use,
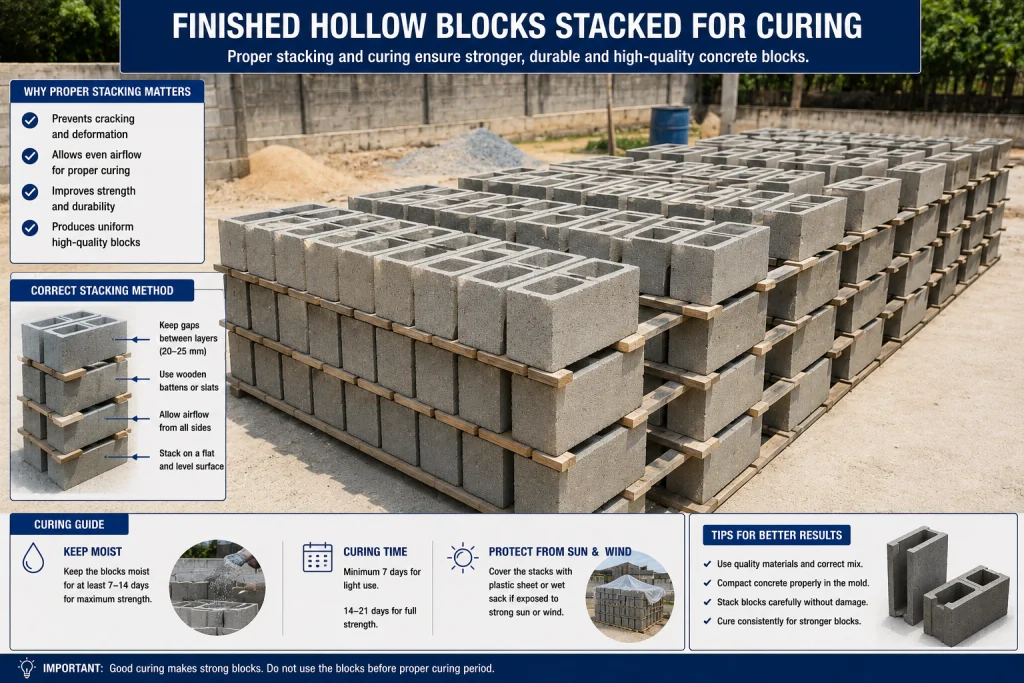
- allow blocks to cure for at least 7–14 days.
You can also design interchangeable inserts to produce:
- 4-inch blocks,
- 6-inch blocks,
- 8-inch blocks
using the same mold frame.
Final Thoughts
A properly welded hollow block mold can produce thousands of strong concrete blocks when built using correct measurements and quality steel. Paying attention to reinforcement, smooth welding, tapered inserts, and proper concrete consistency will improve both production efficiency and block quality.
For small-scale construction businesses, a manual 2-block mold remains one of the most affordable and practical tools for manufacturing concrete hollow blocks locally.
Read Also: Top 5 Cement Firms in Kenya by Market Share and Production Capacity


