Setting up an email account on your iPhone is simple and ensures that you can stay connected on the go. Whether you’re adding a Gmail, Yahoo, Outlook, or another email account, the process is quick and easy. Once added, your email will sync automatically with the Mail app on your iPhone, giving you access to your inbox, calendar, and contacts.
In this guide, we’ll show you how to add an email account to your iPhone and walk you through each step to ensure a smooth setup.
Step 1: Open the Settings App on Your iPhone
To begin, you’ll need to open the Settings app on your iPhone. This app is where you can adjust system preferences, including adding and managing email accounts.
- Open Settings
Find the Settings app on your home screen and tap to open it. - Scroll Down and Tap Mail
In the Settings menu, scroll down and tap on Mail. This is where you manage all your email-related settings.
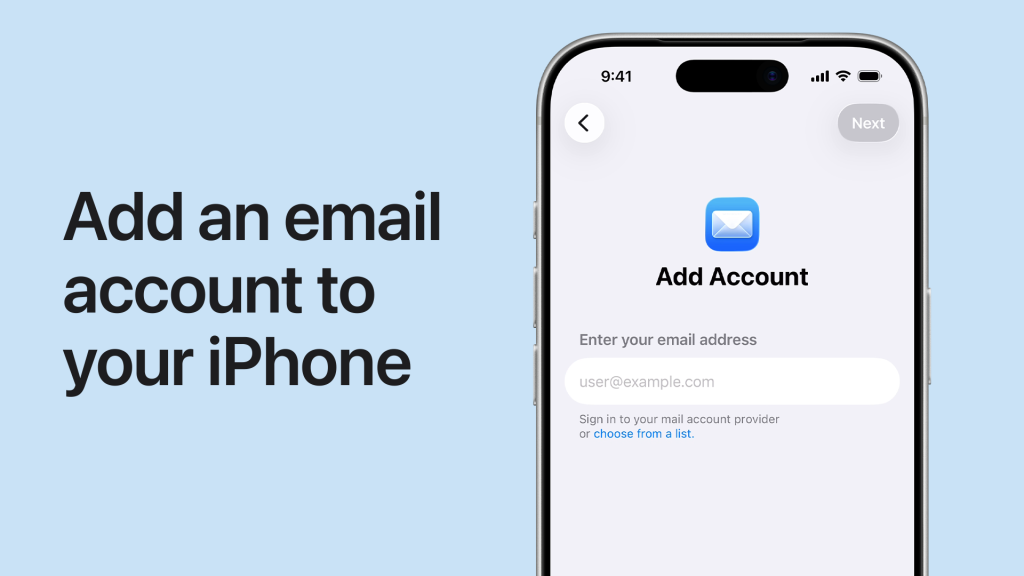
Step 2: Add Your Email Account
Now that you’re in the Mail settings, follow these steps to add your email account:
- Tap Accounts
Under the Mail settings, tap Accounts. This will show all the email accounts currently linked to your iPhone. - Tap Add Account
Tap Add Account at the bottom of the list to begin adding a new email account. - Choose Your Email Provider
You will now be presented with a list of popular email providers, including iCloud, Google, Yahoo, Outlook, and others. Choose your email provider from the list. If your provider isn’t listed, tap Other to add your email manually.
Step 3: Enter Your Email Credentials
Once you’ve selected your email provider, you’ll need to enter your account information.
- Enter Your Email Address and Password
For most providers like Gmail, Yahoo, or Outlook, you’ll be prompted to enter your email address and password. Enter the credentials for your account, and tap Next to continue. - Allow Permissions (if applicable)
For certain email services (like Google), you may be prompted to allow permissions for syncing contacts, calendars, and other data with your iPhone. Make sure to review these permissions and allow them to sync if needed. - Manual Setup (for Other Accounts)
If you selected Other as your email provider, you’ll need to manually enter the server settings. These include:- IMAP or POP: Choose IMAP for syncing your emails across devices.
- Incoming Mail Server: Enter the incoming mail server (e.g., imap.yourprovider.com).
- Outgoing Mail Server: Enter the outgoing mail server (e.g., smtp.yourprovider.com).
Step 4: Choose What to Sync
After entering your email credentials, you will be asked what you want to sync with your iPhone.
- Select What You Want to Sync
You can choose to sync your email, contacts, calendars, and notes. Toggle the switches on for the data you want to sync with your iPhone. - Tap Save
Once you’ve made your selections, tap Save to finish adding the email account.
Step 5: Access Your Email on Your iPhone
After adding your email account, you can access it from the Mail app on your iPhone.
- Open the Mail App
Find the Mail app on your home screen and tap to open it. - View Your Emails
Your new email account will appear in the Mail app, and any emails you have will automatically sync to your device. You can now send, receive, and manage your email directly from your iPhone.
Step 6: Manage Your Email Account Settings
Once your email account is added, you can manage the settings for that account. Here’s how:
- Go to Settings > Mail > Accounts
To adjust settings for any of your email accounts, go to Settings > Mail > Accounts, and tap the email account you want to manage. - Change Settings for Syncing, Notifications, and More
Here you can adjust settings such as:- Sync duration: Choose how many days’ worth of emails you want to sync to your device.
- Notifications: Set up how you’d like to be notified for new emails.
- Mail Settings: You can adjust your account’s name, email address, and password if needed.
Step 7: Troubleshooting Email Account Issues
If you encounter issues with your email account, such as not receiving or sending emails, here are a few troubleshooting steps to follow:
- Check Your Network Connection
Make sure your iPhone is connected to Wi-Fi or cellular data. Email syncing requires a stable internet connection. - Verify Email Settings
If you’re not receiving emails, go back to Settings > Mail > Accounts and check your account settings, including your password and server settings. - Restart Your iPhone
If problems persist, restart your iPhone to ensure that any temporary software glitches are resolved. - Contact Your Email Provider
If you’re still experiencing issues, contact your email provider’s support team for assistance, especially if you’re using a third-party email provider with custom settings.


