Updating your iPhone is essential for ensuring that you have the latest features, bug fixes, and security patches. Apple frequently releases updates to iOS, its operating system, which improves the performance of your device and adds new features. Regular updates help keep your iPhone secure, efficient, and compatible with the newest apps and services.
In this guide, we’ll show you how to update your iPhone, whether you prefer updating over Wi-Fi or using your computer. We’ll also cover what to do before you update, troubleshooting tips, and how to check if an update is available.
How to Update Your iPhone
1. Check for Available iOS Updates
Before you begin the update process, it’s helpful to check if an update is available for your iPhone.
- Open Settings
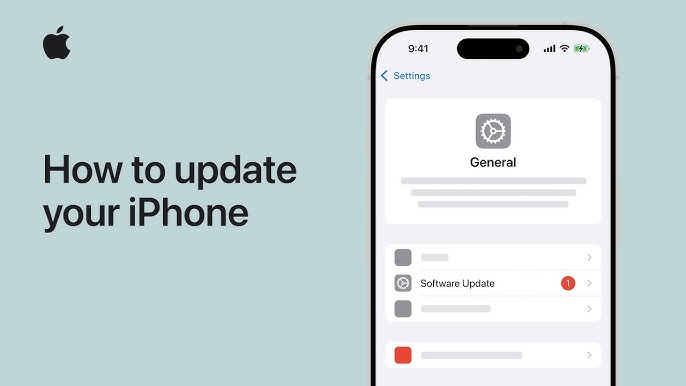
Open the Settings app on your iPhone. - Go to General Settings
Scroll down and tap General. - Check for Software Update
Tap Software Update. Your iPhone will check for any available updates. If an update is available, you’ll see details about the new version and a button to download and install it.
2. Prepare Your iPhone for the Update
Before starting the update, make sure your iPhone is ready to avoid interruptions during the process.
- Ensure a Stable Wi-Fi Connection
You’ll need a stable Wi-Fi connection to download the update. Make sure your iPhone is connected to a reliable Wi-Fi network. - Charge Your iPhone
Ensure your iPhone is charged or plugged into a charger. It’s ideal to have at least 50% battery life or keep your phone charging during the update to prevent it from turning off. - Back Up Your iPhone (Optional but Recommended)
Although iOS updates generally don’t cause data loss, it’s a good practice to back up your device before updating. You can back up to iCloud or iTunes (or Finder on macOS Catalina and later) to ensure your data is secure.- To back up to iCloud: Go to Settings > [Your Name] > iCloud > iCloud Backup, and tap Back Up Now.
- To back up to a computer: Connect your iPhone to your computer, open iTunes (or Finder on macOS Catalina or later), and click Back Up Now.
3. Download and Install the Update
Once you’re prepared, you can begin the download and installation process for the update.
- Tap Download and Install
If an update is available, tap Download and Install. You may be asked to enter your passcode to proceed. - Agree to Terms and Conditions
Apple will prompt you to agree to their terms and conditions for the update. Read through the terms and tap Agree to continue. - Wait for the Update to Download
Your iPhone will begin downloading the update. This may take some time depending on the size of the update and your internet connection speed. You can continue using your iPhone during the download. - Install the Update
Once the download is complete, your iPhone will prompt you to install the update. Tap Install Now to start the installation process. Your iPhone will restart to apply the update. - Wait for the Update to Complete
The installation process may take several minutes. Your iPhone will restart and show an Apple logo with a progress bar. Once the update is complete, your iPhone will boot into the new version of iOS.
4. Enable Automatic Updates (Optional)
If you want to avoid manually checking for updates, you can enable automatic updates so your iPhone will update itself automatically.
- Turn on Automatic Updates
Go to Settings > General > Software Update > Automatic Updates, and toggle on Download iOS Updates and Install iOS Updates. - How Automatic Updates Work
With automatic updates enabled, your iPhone will download updates in the background when connected to Wi-Fi and plugged into a charger. The update will be installed automatically when your iPhone is not in use, typically overnight.
5. What to Do if the Update Doesn’t Work
If the update fails to install or causes issues with your iPhone, here are a few troubleshooting tips:
- Check Available Storage
Ensure that your iPhone has enough available storage to complete the update. To check, go to Settings > General > [Device] Storage. If necessary, free up space by deleting apps, photos, or videos. - Retry the Update
If the update fails to download or install, try restarting your iPhone and checking for the update again. Tap Settings > General > Software Update, and see if the update can be downloaded and installed. - Update via iTunes or Finder
If the update won’t work over Wi-Fi, you can try updating via your computer. Connect your iPhone to your Mac or PC, open iTunes (or Finder on macOS Catalina or later), and select your device. Then, click Check for Update and follow the prompts to install the latest iOS version. - Restore Your iPhone
If the update still doesn’t work, you can restore your iPhone to its factory settings and then update. Make sure to back up your device first, then restore it via iTunes or Finder, and reinstall the latest iOS version.
6. Post-Update Setup
After the update is complete, you may need to reconfigure certain settings or features on your iPhone, such as:
- Re-enable Face ID or Touch ID
If the update reset biometric authentication, go to Settings > Face ID & Passcode (or Touch ID & Passcode) to set it up again. - Check App Compatibility
Some apps may require updates after an iOS upgrade. Open the App Store, tap your profile icon, and select Update All to ensure your apps are up-to-date. - Review New Features
Each iOS update introduces new features. To discover what’s new, visit the Apple website or check the What’s New section in your iPhone settings.
Why Keeping Your iPhone Updated Is Important
Updating your iPhone ensures that you benefit from the latest features, security patches, and performance improvements. Regular updates help maintain your device’s compatibility with apps, improve its efficiency, and keep it secure against vulnerabilities.
Final Thoughts on Updating Your iPhone
Updating your iPhone is an essential task to ensure that your device remains secure, efficient, and up-to-date with the latest features. Whether you prefer updating manually or setting up automatic updates, staying current with the latest iOS versions guarantees a smooth and optimal iPhone experience.