How to turn video into Live Photo is a question many iPhone and Mac users ask when they want to capture motion without keeping full video files. Videos often contain the perfect moment, but extracting it in a format that feels alive and shareable takes the right approach.
Live Photos sit between still images and videos. They capture a short burst of motion and sound, making moments feel more natural. Because they only store a few seconds of movement, Live Photos are lighter than videos but more expressive than screenshots. That balance makes them ideal for wallpapers, social posts, or memories you want to revisit quickly.
In this guide, you’ll learn how to turn video into Live Photo on iPhone step by step, how to handle the same task on Mac using practical workarounds, and when it’s better to extract still images or create GIFs instead. You’ll also see how to keep your library clean after converting media, which is often overlooked but essential.
Understanding Live Photos Before You Convert
A Live Photo captures about three seconds of motion around a still image. That motion plays when you long-press the photo in the Photos app. Compared to videos, Live Photos use less storage. Compared to still images, they add context and emotion.
If storage matters most, exporting still frames from a video is the lightest option. If movement matters, Live Photos are the better choice.
How to Turn Video Into Live Photo on iPhone Step by Step
The iPhone offers the simplest workflow for converting video into Live Photo. There is no built-in Apple feature for this task, but third-party apps handle it smoothly.
The most straightforward option is intoLive.
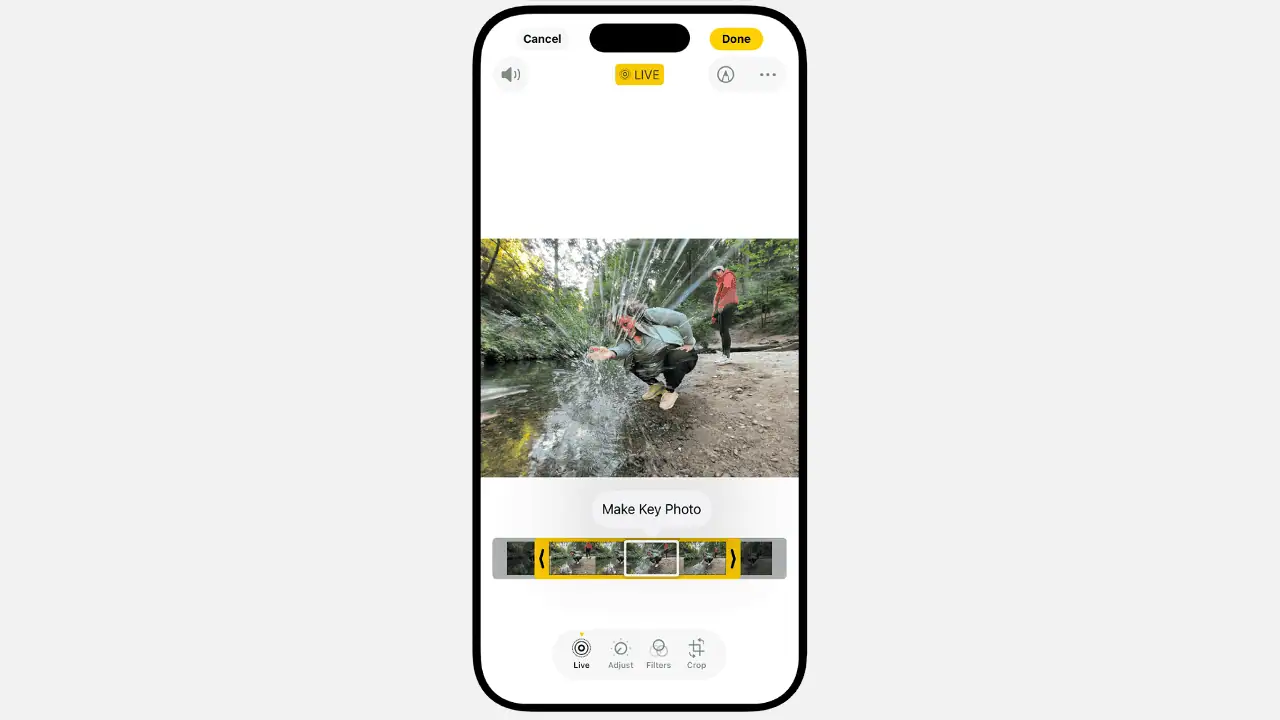
Steps to convert video into Live Photo on iPhone:
Download intoLive from the App Store
Open the app and select a video
Trim the clip to a short section, ideally 3–5 seconds
Tap Make in the top right corner
Choose how many times the Live Photo should loop
Save the Live Photo to Photos
Shorter clips convert more smoothly and take up less space. MOV and MP4 formats work best.
When Still Photos Are the Better Choice
Live Photos are dynamic, but still images are lighter and easier to reuse. If you want thumbnails, cover images, or clean stills from a video, frame extraction is the better option.
SnapMotion lets you scrub through a video frame by frame and export high-quality still images. This avoids compression issues that come with screenshots and gives you precise control over timing.
How Android Handles Motion Photos
Android devices use Motion Photos, which are conceptually similar to Live Photos. However, most Android phones only create them during capture. Converting existing videos into Motion Photos is not supported natively.
Third-party apps can create looping clips or GIFs, but the results do not integrate as seamlessly as Live Photos do on iOS.
How to Convert a Live Photo to Video on iPhone
Some platforms do not support Live Photos. In those cases, converting a Live Photo back into a video is useful.
Steps:
Open Photos
Select a Live Photo
Tap the three-dot menu
Choose Save as Video
iOS creates a short video without deleting the original Live Photo. This process often creates duplicates, so cleanup is important later.
Best Apps to Turn Videos Into Live Photos on iPhone
Converting media repeatedly can clutter your library. Duplicate Live Photos, videos, and still frames add up quickly.
CleanMy®Phone helps identify duplicate and similar photos, including Live Photos created from videos. It highlights the best version and suggests safe deletions.
To move converted files to a Mac efficiently, AnyTrans for iOS allows fast transfers by media type, avoiding messy manual exports.
How to Set a Live Photo as iPhone Wallpaper
Live Photos can be used as Lock Screen wallpapers.
Steps:
Open Photos and go to Live Photos
Select your Live Photo
Tap Share and choose Use as Wallpaper
Adjust positioning and ensure Live Photo is enabled
Tap Add
If the animation does not play, disable Low Power Mode and Reduce Motion in Accessibility settings.
How to Turn Video Into Live Photo on Mac Using Workarounds
macOS does not support direct video-to-Live Photo conversion. The most reliable method uses an iPhone as a bridge.
Workflow:
Transfer video from Mac to iPhone using AnyTrans for iOS
Convert video to Live Photo on iPhone with intoLive
Transfer Live Photo back to Mac
While indirect, this method preserves quality and compatibility.
Downloading Videos on Mac Safely
If your videos originate online, download them safely before converting.
Pulltube downloads videos from many platforms and lets you trim clips before transferring them to iPhone for Live Photo creation.
Using GIFs as a Live Photo Alternative on Mac
If looping motion is acceptable, GIFs are a practical substitute.
Permute converts videos into GIFs locally, without privacy risks.
Steps:
Open Permute
Add a video file
Choose GIF format
Start conversion
Locate the GIF in Finder
GIFs loop automatically and can be shared widely, though they lack sound.
How to Convert Live Photos to Video on Mac
You can export Live Photos as videos directly from the Photos app.
Steps:
Open Photos
Select Live Photos
Go to File > Export > Export Unmodified Original
Choose destination
macOS exports a video file and a still image. These leftovers should be cleaned.
Gemini quickly identifies redundant files created during exports and suggests safe deletions.
Turning Photos Into Videos With Time-Lapse
A single photo cannot become a real video, but multiple images can.
GlueMotion combines images into smooth time-lapse videos, useful for creative projects.
How to Turn Live Photos Into GIFs on Mac
macOS Shortcuts includes a built-in Live Photo to GIF workflow.
Steps:
Open Shortcuts
Search Gallery for “Make GIF”
Add the shortcut
Run it on selected Live Photos
This feature requires macOS Monterey or later.
How to Convert GIF to Live Photo on iPhone
GIFs can be converted directly into Live Photos on iPhone using GIPHY.
Steps:
Install GIPHY
Select a GIF
Tap the options menu
Choose Convert to Live Photo
Save
This skips intermediate steps and integrates smoothly with Photos.
Tips for Best Live Photo Results
Trim clips to 3–5 seconds for smoother playback
Use high-quality source videos
Mute sound for wallpaper use
Clean duplicates regularly
Avoid unknown online converters
Trusted apps protect both quality and security.


