Restoring your iPhone from a backup is one of the best ways to recover lost data, settings, or apps after a mishap or even upgrading to a new device. Whether you accidentally deleted something, suffered a system failure, or just want to transfer everything to a new phone, iPhone backups are your safety net.
But restoring your iPhone from a backup might seem daunting if you haven’t done it before. Whether you’re using iCloud, a local backup, or a third-party app, it’s simpler than it sounds. I’ve got your back with an easy-to-follow guide that walks you through all the steps, from checking your backups to restoring everything on your iPhone seamlessly.
Let’s get started and explore the best ways to restore your iPhone from backup in 2026!
Why Should You Restore from Backup?
Backups are essential for safeguarding your data, especially with iPhones, where personal information, media, and apps are critical to daily life. If your iPhone ever breaks, gets lost, or experiences a software glitch, restoring from backup can help you recover everything without much hassle.
- Data Recovery: Backup ensures that your important documents, photos, and videos can be restored.
- Seamless Transfer: If you’re upgrading to a new iPhone, restoring a backup lets you bring all your apps and settings to the new device.
- Avoid Data Loss: Having a backup means your data is secure even if you face a hardware issue or accidental deletion.
Now, let’s dive into the process of restoring from both iCloud and local backups!
How to Restore Your iPhone from a Local Backup
Restoring from a local backup (using Finder or iTunes) is perfect if you want to restore a full copy of your iPhone, including apps, settings, and all your media. This method doesn’t rely on your internet connection, making it faster than restoring from iCloud.
What you’ll need:
- Your iPhone
- A USB cable
- A Mac with Finder (macOS 10.15 or later) or iTunes (macOS 10.14 or earlier, or Windows)
Steps to restore using Finder (macOS 10.15 or later):
- Connect your iPhone to your Mac with a USB cable.
- Open Finder and select your device from the sidebar.
- Click Restore from this Backup under the General tab.
- Choose the backup you want to restore from and click Restore.
- Enter your device passcode if prompted.
Steps to restore using iTunes (macOS 10.14 or earlier, or Windows):
- Connect your iPhone to your computer using a USB cable.
- Open iTunes and select your iPhone in the top-left corner.
- Click Restore Backup under the Summary tab.
- Choose the backup you want and click Restore.
Once the restoration is complete, your iPhone will reboot with all your previous data and settings.
How to Restore Your iPhone from iCloud Backup
Restoring your iPhone from iCloud is a great option if you’ve been backing up to the cloud. With iCloud, all your data is stored online, so you can restore it from anywhere with a stable internet connection.
Steps to restore from iCloud:
- Make sure your iCloud backup is up-to-date.
- Erase all content and settings on your iPhone by going to Settings > General > Transfer or Reset iPhone > Erase All Content and Settings.
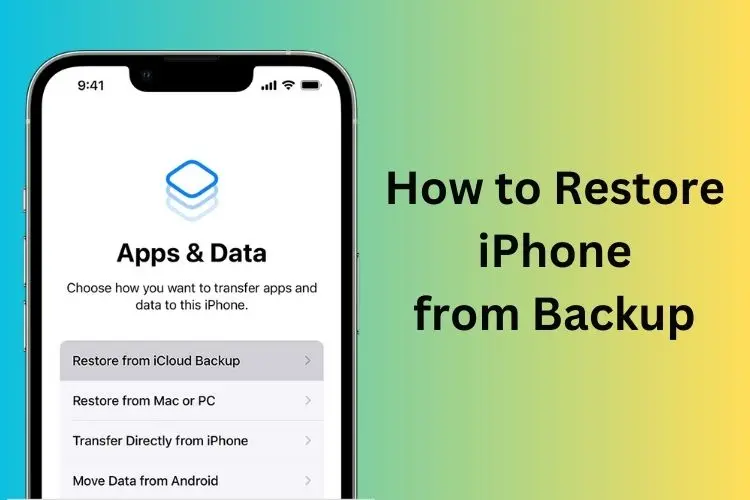
- After the reset, your iPhone will restart, and you’ll see the Hello screen. Follow the setup steps until you reach the Apps & Data screen.
- Select Restore from iCloud Backup.
- Sign in with your Apple ID and choose the backup you want to restore.
- Stay connected to Wi-Fi and keep your device plugged in until the restoration is complete.
The restoration may take some time, depending on the backup size and your internet speed. Once it’s done, your iPhone will reboot, and you’ll have all your apps, photos, and settings back.
Tip: Before restoring from iCloud, you can use apps like CleanMy®Phone to declutter your iCloud storage, ensuring you only back up necessary files and reduce future restore times.
Restoring iPhone from Backup After Setup
If you’ve already started setting up your iPhone and realized you need to restore from a backup, don’t worry! You can still erase your device and restore it without losing your data.
Steps to restore after setup:
- Go to Settings > General > Transfer or Reset iPhone > Erase All Content and Settings.
- Confirm your passcode and Apple ID password to proceed.
- Once your iPhone restarts, follow the setup process until you reach the Apps & Data screen.
- Choose Restore from iCloud Backup or Restore from Mac/PC, depending on where your backup is stored.
- Sign in with your Apple ID and select the backup you want to restore.
How to Restore Specific Data without a Full Factory Reset
If you only need to restore specific data (like messages, contacts, or photos) without performing a full factory reset, AnyTrans for iOS is a great tool to consider. It allows you to restore files from backups without affecting the rest of your device’s data.
Steps to restore specific data:
- Install and open AnyTrans for iOS on your Mac.
- Connect your iPhone to your Mac using a USB cable.
- Click on Backup Manager and select Restore Backup.
- Browse through the backup content and select the files you want to restore.
- Click Restore to transfer the selected files to your iPhone.
Troubleshooting Common Restore Issues
Restoring from backup isn’t always smooth sailing, but most issues can be resolved with a little effort. Here are some common problems and fixes:
- Backup Not Found: Ensure you’re signed in to the correct Apple ID in Settings > iCloud > Storage > Backups.
- Slow Restoration: Use a stable and fast Wi-Fi network, and keep your iPhone plugged into a charger during the process.
- iCloud Restore Errors: Check your iPhone’s available storage and ensure it’s up-to-date with the latest iOS version.
- Incomplete Restoration: Use apps like AnyTrans to restore specific files like photos or messages that were missed.


