Whether you’re camping off-grid or parked at home, knowing how to connect an RV to power is essential for running appliances and keeping batteries charged. Most RV parks and campgrounds provide power boxes with different outlet types, and even a home outlet can work if used correctly. The process is simple once you understand the amperage requirements, the right adapters, and safety steps to prevent electrical damage. Keeping the correct adapters in your RV ensures you can stay powered up wherever you travel.
Guide Table: How to Connect an RV to Power
| Step | Action | Description |
|---|---|---|
| 1. Choose the Right Adapter | Identify your RV’s power cable type. | Check prongs and match with available outlets (30, 50, or 15 amps). |
| 2. Plug into a 30- or 50-Amp Source | Use a dogbone adapter if needed. | Turn off breakers before plugging in, then reconnect safely. |
| 3. Use a Home Outlet | Use a 15-amp adapter carefully. | Limit appliance use to avoid tripping breakers or overheating. |
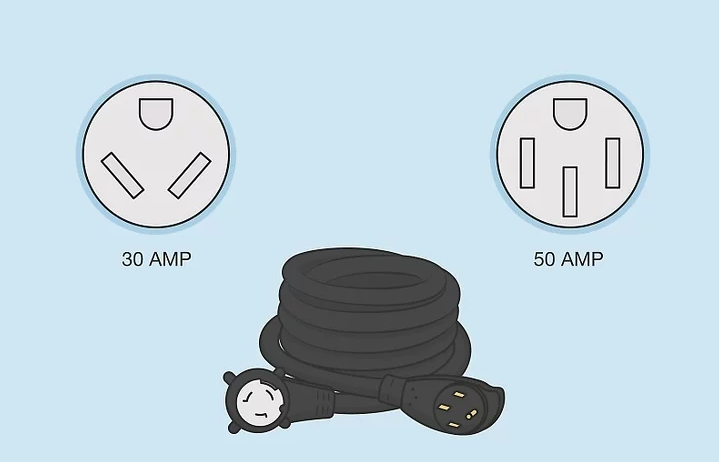
Choosing an Adapter
Start by examining your RV’s power cord. A 30-amp cord has three prongs (one round and two angled), while a 50-amp cord has four prongs (one round and three straight). Compare this to the available power source: campground pedestals typically have both 30- and 50-amp outlets, while home outlets are 15 or 20 amps.
If the plug types differ, use a dogbone adapter — a short cord with mismatched male and female ends. The female end connects to your RV, and the male end fits the available power supply. Choose an adapter rated for the highest available amperage to ensure a stable connection.
Plugging into a 30- or 50-Amp Power Supply
Before plugging in, switch off all electrical appliances and systems inside your RV. Turn off the power supply box breaker to prevent surges. Connect your RV’s power cable to the appropriate adapter, then plug it firmly into the matching outlet on the power pedestal. Once connected, flip the breaker back on to activate power.
This method is known as connecting to shore power, providing full electricity to your RV’s systems, including air conditioning, kitchen appliances, and outlets. If you’re using a generator instead, ensure it produces at least 3,500 watts to handle your RV’s load safely.
Using a Home Electrical Outlet
To connect an RV to power at home, use a dogbone adapter with a 15-amp male end and either a 30- or 50-amp female end. Turn off your RV’s power and the corresponding home breaker before connecting. Plug the adapter into the home outlet, ensuring the connection is snug.
Because household outlets provide limited current, avoid using high-demand appliances like air conditioners. It’s ideal to use this setup for battery charging, lighting, or small electronics only. Use a heavy-duty extension cord if your RV cable doesn’t reach the outlet, and always ensure it’s rated for outdoor use.
Tips
- Always use surge protectors to protect against voltage spikes.
- Keep multiple adapters in your RV for different power setups.
- A 30- or 50-amp connection allows full appliance use, while a 15-amp outlet is best for light loads.
Warnings
- Treat all electrical wires as live, even when turned off.
- Never overload a home outlet; it can trip breakers or cause electrical fires.
- Avoid using worn or damaged adapters or cords.
By following these safety steps, you can confidently connect an RV to power from any source — ensuring all your systems stay powered, your batteries stay charged, and your adventures stay uninterrupted.


