Losing data on your iPhone can be heart-wrenching, whether it’s from an unexpected crash, an accidental deletion, or even just a moment of carelessness. Fortunately, restoring your iPhone from a backup is easier than you might think. Whether you’ve backed up your device via iCloud, Finder, or iTunes, this guide will help you restore everything seamlessly.
In this article, we’ll walk you through the best methods for restoring an iPhone from a backup, ensuring you can quickly recover your precious data and keep your device up and running.
Why Backups Matter
We all store vital information on our iPhones—photos, contacts, notes, and even important documents. Losing this data could feel devastating, but with proper backups, you can rest assured that your information is always recoverable. iCloud and local backups (through Mac or Windows) are two reliable ways to safeguard your data.
To check if your iPhone is backed up:
- Go to Settings > Apple ID > iCloud.
- Tap iCloud Backup.
- Check the date of your last successful backup.
If you’ve never backed up your iPhone, now’s the time to start!
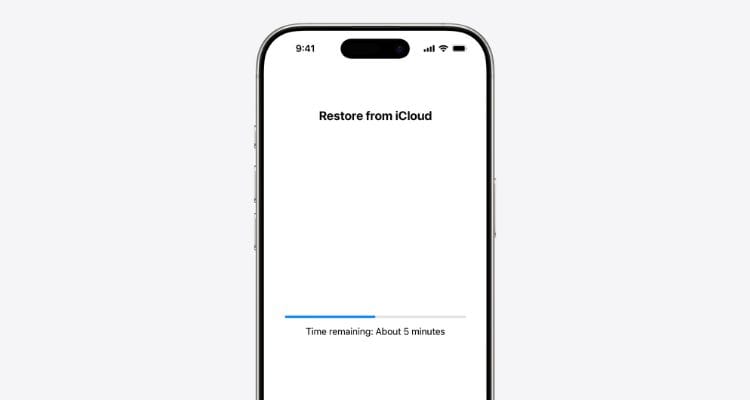
How to Restore iPhone from iCloud Backup
Restoring from iCloud backup is one of the easiest and most common methods, especially when you’re setting up a new iPhone or after a reset.
Steps to restore from iCloud backup on a new iPhone:
- Turn on your iPhone and follow the initial setup steps until you reach the Apps & Data screen.
- Select Restore from iCloud Backup.
- Sign in with your Apple ID.
- Choose the most recent backup to restore from.
- Stay connected to a stable Wi-Fi network until the process completes.
Note: Larger backups may take several hours to complete, depending on your Wi-Fi speed. During this time, keep your iPhone plugged into a charger.
If you’ve already set up your iPhone and wish to restore from an iCloud backup, you’ll need to erase your device first:
- Go to Settings > General > Transfer or Reset iPhone > Erase All Content and Settings.
- After your iPhone restarts, follow the setup process, select Restore from iCloud Backup, and log in with your Apple ID.
Pros:
- Restore all apps, settings, and data from iCloud seamlessly.
- iCloud backups are stored safely in Apple’s cloud.
Cons:
- Requires Wi-Fi connection, which can be slow for large backups.
- Erasing the device is necessary if the backup wasn’t restored during initial setup.
How to Restore iPhone from Backup Without Erasing Data
If you don’t want to erase all your data just to restore certain items, AnyTrans for iOS is the perfect tool. It allows you to restore specific data from your iCloud or local backups without resetting your iPhone.
How to use AnyTrans for iOS:
- Install and open AnyTrans for iOS on your Mac or PC.
- Connect your iPhone to your computer using a Lightning cable.
- In AnyTrans, go to the Backup Manager tab.
- Click Restore Backup, select the backup you want to use, and preview its contents.
- Choose the specific files or apps you want to restore without overwriting the existing data.
Pros:
- Restore specific files or apps from a backup without wiping your device.
- Manage multiple backups with ease.
Cons:
- Requires third-party software.
- Limited functionality without a paid subscription.
How to Restore iPhone from Backup Using a Mac
If you prefer to use a Mac for restoration, you can do so with Finder (macOS 10.15 or later) or iTunes (macOS Mojave or earlier).
Steps to restore from a backup using Finder (macOS 10.15+):
- Connect your iPhone to your Mac using a USB cable.
- Open Finder and select your device under Locations in the sidebar.
- In the General tab, click Restore Backup.
- Choose the backup you want to restore and click Restore.
- Enter your password if the backup is encrypted and wait for the process to complete.
Steps to restore from a backup using iTunes (macOS Mojave or earlier or Windows):
- Connect your iPhone to your computer and open iTunes.
- Select your iPhone in the top-left corner.
- Under the Summary tab, click Restore Backup.
- Choose the backup and click Restore.
- Enter the backup password if it’s encrypted and wait for the restoration to finish.
Pros:
- Fast and efficient method for restoring from a local backup.
- Doesn’t require an internet connection.
Cons:
- Requires a Mac or PC for the restoration.
- Only works with physical connections, not wirelessly.
iCloud vs Local Backup: Which One Should You Choose?
When choosing between iCloud backup and local backup, consider the following:
| iCloud Backup | Local Backup (Mac/PC) |
|---|---|
| Limited to 5GB free storage unless upgraded | Limited by computer storage capacity |
| Accessible anytime, anywhere with Wi-Fi | Faster for large backups |
| Encrypted by default | Optional encryption available |
| Slower backup speeds depending on Wi-Fi | Faster data transfer speeds for large files |
If you prefer cloud-based solutions that are accessible anywhere, iCloud might be your best bet. However, if you need speed and want more control over your backups, a local backup using Finder or iTunes might suit you better.
Final Thoughts: Restoring iPhone from Backup
Restoring your iPhone from a backup doesn’t have to be a stressful process. Whether you prefer iCloud, Finder, or third-party tools like AnyTrans for iOS, there’s an option for every user. If you don’t want to lose precious data, always back up your iPhone regularly and make sure you know the best recovery methods.
For more efficient backup management, consider using AnyTrans for iOS to restore specific files without resetting your device. With these options, you’ll always be prepared in case of accidental data loss.


