Nyongesa Sande
No Result
View All Result
  • News
    • World
    • Africa
  • Politics
  • Business
  • Tech
  • AI
  • Telecom
  • Sports
  • Opinion
  • Lifestyle
  • Live
Nyongesa Sande
No Result
View All Result
Nyongesa Sande
No Result
View All Result
  • News
  • Politics
  • Business
  • Tech
  • AI
  • Telecom
  • Sports
  • Opinion
  • Lifestyle
  • Live
ADVERTISEMENT

Home » Perform a Clean Install of OS X Mountain Lion on Startup Drive

Perform a Clean Install of OS X Mountain Lion on Startup Drive

NyongesaSande News Desk by NyongesaSande News Desk
2 years ago
in Mac Specifications
Reading Time: 4 mins read
A A
macOS 16 Preview: Expected Release, Features, and Compatibility Insights

Performing a clean install of OS X Mountain Lion on your startup drive gives your Mac a fresh start with a new system free from accumulated clutter and potential issues. Here’s a detailed guide on how to safely and effectively perform a clean installation.

  • Preparing for Installation
  • Steps to Perform a Clean Install
  • Post-Installation
  • Tips and Considerations

Preparing for Installation

  1. Create a Bootable Installer: Since you can’t erase and install on the same drive without bootable media, you’ll first need to create a bootable installer for OS X Mountain Lion. Use an external drive or USB stick for this purpose.
  2. Back Up Your Data: Ensure that you have a full backup of your data, as a clean install will erase all the data on the startup drive. Use Time Machine or another backup method to secure your files.
  3. Check Compatibility: Verify that your Mac meets the minimum system requirements for OS X Mountain Lion. You’ll need a Mac running OS X Snow Leopard 10.6 or later to access the Mac App Store to download Mountain Lion.
  4. Prepare Your Mac: Ensure that your Mac is plugged into a power source and connected to the internet. This is important as the installation process may require downloading additional components.

Steps to Perform a Clean Install

  1. Restart Your Mac with the Bootable Installer:
    • Insert the bootable media.
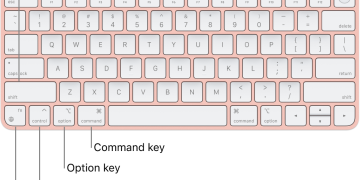
    • Restart your Mac while holding down the Option key.
    • Select the bootable installer from the startup manager and press Enter.
  2. Erase Your Startup Disk:
    • Once booted from the installer, choose ‘Disk Utility’ from the OS X Utilities menu.
    • Select your startup disk, usually named ‘Macintosh HD’, from the sidebar.
    • Click the ‘Erase’ tab and choose ‘Mac OS Extended (Journaled)’ from the format options.
    • Click ‘Erase’ to format the drive. Confirm your decision when prompted.
  3. Quit Disk Utility:
    • After erasing the disk, quit Disk Utility to return to the OS X Utilities selector.
  4. Install OS X Mountain Lion:
    • Choose ‘Reinstall OS X’ from the OS X Utilities menu.
    • Click ‘Continue’ and follow the prompts to begin the installation.
    • The installer will download necessary files from Apple’s servers. Follow the on-screen instructions to complete the installation.
  5. Setting Up Your Mac:
    • Once the installation is complete, your Mac will restart.
    • Follow the setup assistant to configure your Mac. This includes setting up your location, Apple ID, and other preferences.
    • If you opted to back up your data, you can now use Migration Assistant to transfer your data back to your Mac.

Post-Installation

  • Check for Updates: After installation, check for any software updates by going to the Apple menu > Software Update. Install any available updates to ensure your OS is current.
  • Restore Your Data: If you backed up your data, use Migration Assistant or manually move your data back onto your Mac.

Tips and Considerations

  • Creating a Bootable Installer: You might need to use third-party software or terminal commands to create a bootable installer. Make sure your external drive or USB stick has at least 12GB of available space.
  • Internet Connection: A stable internet connection is crucial during the installation process as the system may need to download additional components.
  • Power Supply: Keep your Mac connected to a power source throughout the installation process to prevent any interruptions due to power loss.

Performing a clean install can enhance your Mac’s performance and provide a fresh version of the OS free from legacy issues. Always ensure you have a reliable backup before proceeding with the installation to safeguard your data.

Tags: clean install of OS X Mountain Lion
Google Add as a Preferred Source on Google
Previous Post

Comprehensive Guide to Handling a Cracked iPad Screen: Costs, Repair Options, and Prevention Tips

Next Post

How to Safely Purchase an iPad on Craigslist: A Step-by-Step Guide

NyongesaSande News Desk

NyongesaSande News Desk

Nyongesa Sande offers diverse content across news, technology, entertainment, and more, aiming to provide readers with a wide range of informative and engaging articles. NYONGESA SANDE's dedicated team provides our audience not only with the highly relevant news but also with outstanding interactive experience.

Related Posts

M4 Mac Mini
Mac Mini

Apple Drops 256GB M4 Mac Mini Model

1 month ago
How to Free Up Storage Space on Mac – Easy Guide to Clear Space
How To

How to Free Up Storage Space on Mac – Easy Guide to Clear Space

4 months ago
How to Back Up Your Mac with Time Machine
How To

How to Back Up Your Mac with Time Machine

4 months ago
How to Use Split View on Mac – Efficient Multitasking Tips
Instructables

How to Use Split View on Mac – Efficient Multitasking Tips

4 months ago
How to Use Mac Keyboard Shortcuts – Boost Productivity with Simple Commands
How To

How to Use Mac Keyboard Shortcuts – Boost Productivity with Simple Commands

4 months ago
How to Update macOS on Your Mac: A Simple Guide
iMac

How to Update macOS on Your Mac: A Simple Guide

4 months ago
Load More
Next Post
Apple iPad Pro 11 (2022) Full Specification

How to Safely Purchase an iPad on Craigslist: A Step-by-Step Guide

Anticipating the Release of the 27-inch ProMotion Display iMac: Features, Specs, and Price Insights

Anticipating the Release of the 27-inch ProMotion Display iMac: Features, Specs, and Price Insights

ADVERTISEMENT

Who We Are

Nyongesa Sande

NyongesaSande.com is a digital news and media platform covering breaking news, business, technology, AI, politics, sports, world affairs and African innovation.

News Sections

  • News
    • World
    • Africa
  • Politics
  • Business
  • Tech
  • AI
  • Telecom
  • Sports
  • Opinion
  • Lifestyle
  • Live

Editorial Standards

  • Editorial Policy
  • Fact Checking Policy
  • Corrections Policy
  • Ethics Policy
  • AI Usage Policy
  • News Tips
  • Submit Press Release

Legal

  • Privacy Policy
  • Terms of Use
  • Cookie Policy
  • Disclaimer
  • Risk Disclaimer
  • DMCA
  • Ad Choices

Our Company

  • About Us
    • Nyosake Designers
      • Nyosake Webmasters
      • Nyosake Investment
  • Contact Us
    • Newsroom Contact
  • Ownership Disclosure
  • Advertise
  • Privacy Policy
  • Terms of Use
  • Cookie Policy
  • Disclaimer
  • Risk Disclaimer
  • DMCA
  • Ad Choices

NyongesaSande.com is an independent digital news and media platform covering Africa, business, technology, AI, politics and global developments.

© 2026 NyongesaSande.com. All rights reserved.

No Result
View All Result
  • News
    • World
    • Africa
  • Politics
  • Business
  • Tech
  • AI
  • Telecom
  • Sports
  • Opinion
  • Lifestyle
  • Live

NyongesaSande.com is an independent digital news and media platform covering Africa, business, technology, AI, politics and global developments.

© 2026 NyongesaSande.com. All rights reserved.