Nyongesa Sande
No Result
View All Result
  • News
    • World
    • Africa
  • Politics
  • Business
  • Tech
  • AI
  • Telecom
  • Sports
  • Opinion
  • Lifestyle
  • Live
  • World Cup 2026
    • World Cup 2026 Standings
    • World Cup 2026
Nyongesa Sande
  • About Us
    • Nyosake Designers
      • Nyosake Webmasters
      • Nyosake Investment
  • Contact Us
    • Newsroom Contact
  • Ownership Disclosure
  • Advertise
No Result
View All Result
Nyongesa Sande
No Result
View All Result
  • News
  • Politics
  • Business
  • Tech
  • AI
  • Telecom
  • Sports
  • Opinion
  • Lifestyle
  • Live
  • World Cup 2026
ADVERTISEMENT

Home » How to Make Battery Cables

How to Make Battery Cables

NyongesaSande News Desk by NyongesaSande News Desk
2 years ago
in How To
Reading Time: 6 mins read
A A
How to Make Battery Cables

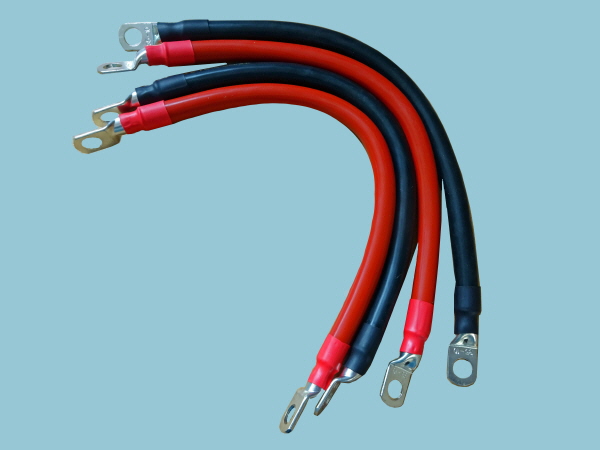
Building your own battery cables can save money and ensure a durable connection for your vehicle, boat, or other machinery. Follow these step-by-step instructions to create custom battery cables that fit your exact needs.

  • Parts Overview
  • Part 1: Grabbing Supplies
  • Part 2: Preparing the Cables
  • Part 3: Attaching the Terminal Lugs
  • Part 4: Attaching the Terminals
  • Tips
  • Warnings

Parts Overview

  1. Grabbing Supplies
  2. Preparing the Cables
  3. Attaching the Terminal Lugs
  4. Attaching the Terminals

Part 1: Grabbing Supplies

  1. Inspect Your Battery and Connections
    • Check for rust, corrosion, or damaged cables. Identify which cables need replacement by removing any faulty ones.
  2. Determine Cable Gauge and Type
    • Locate the gauge size printed on your existing cable (e.g., “2/0 AWG”). Ensure your replacement cable and terminals match this size.
    • Use untreated copper wire for dry applications (cars, tractors) and tinned wire for wet applications (boats, jet skis).
  3. Collect Required Materials
    • Cable (copper or tinned, depending on use).
    • Terminals and Terminal Lugs (matching gauge).
    • Non-acidic solder wire (e.g., rosin core).
    • Rosin flux paste or fluid.
    • Shrinkable sheathing (cut into four 4-6″ pieces).
  4. Tools Needed
    • Cable cutters.
    • Heat source (butane torch recommended).
    • Crimping tool or flat nail punch and hammer.
    • Wire cutters.

Part 2: Preparing the Cables

  1. Cut the Cable
    • Use heavy-duty cable cutters for smooth, clean cuts. Avoid saws or knives that can create jagged ends.
  2. Strip the Insulation
    • Remove about 1 inch of rubber housing from each cable end to expose the wire.
  3. Remove Loose Strands
    • Check for and remove any stray strands of wire to ensure a neat connection.
  4. Add Shrink Tubing
    • Slide two pieces of shrink tubing onto each cable, positioning them away from the exposed ends.

Part 3: Attaching the Terminal Lugs

  1. Apply Flux Paste
    • Coat the inside of the terminal lug and the exposed wire ends with rosin flux paste to improve conductivity.
  2. Insert the Cable into the Terminal Lug
    • Push the cable into the lug as far as it will go.
  3. Crimp the Terminal Lug
    • Use a crimping tool or hammer with a flat nail punch to secure the lug to the wire. Crimp on both sides for a tight fit.
  4. Heat and Solder the Connection
    • Use a torch to heat the lug until the flux boils, then solder the connection where the cable meets the terminal lug.
  5. Shrink the Tubing
    • Slide the shrink tubing up to cover the exposed connection. Use your heat source to shrink it tightly around the cable and lug.

Part 4: Attaching the Terminals

  1. Secure the Terminal in a Vice
    • Clamp the terminal securely in a vice with the open end facing up.
  2. Apply Flux Paste
    • Coat the inside of the terminal and the exposed cable ends with flux paste.
  3. Heat the Terminal
    • Use a torch to heat the terminal until the flux boils. Preheat the cable for 12-15 seconds as well.
  4. Insert the Cable
    • Push the preheated cable into the terminal.
  5. Solder the Connection
    • Solder the point where the terminal and wire meet to ensure a solid connection.
  6. Clean Up Loose Strands
    • Use wire cutters to trim any loose or exposed strands.
  7. Apply Shrink Tubing
    • Slide the shrink tubing into place and heat it until it snugly covers the exposed connection.

Tips

  • Patience Pays Off: Taking the time to make clean cuts and solder carefully will result in longer-lasting cables.
  • Use Proper Tools: Investing in high-quality tools ensures better results and saves time.

Warnings

  • Work Safely: Always wear gloves and goggles when working with high heat and electricity.
  • Dispose of Materials Properly: Follow local regulations for disposing of old cables, solder, and flux.

By following these steps, you can create durable, high-quality battery cables for your machine or vehicle.

Tags: How To
Share2Tweet1SendShareScanSharePinShareShare
Google Add as a Preferred Source on Google
Previous Post

How to Do the Honda Navigation Update with a DVD

Next Post

How to Make a Drone

NyongesaSande News Desk

NyongesaSande News Desk

Nyongesa Sande offers diverse content across news, technology, entertainment, and more, aiming to provide readers with a wide range of informative and engaging articles. NYONGESA SANDE's dedicated team provides our audience not only with the highly relevant news but also with outstanding interactive experience.

Related Posts

How to Weld a 2-Block Rectangular Hollow Block Mold: Measurements, Materials and Step-by-Step Guide
How To

How to Weld a 2-Block Rectangular Hollow Block Mold: Measurements, Materials and Step-by-Step Guide

2 months ago
How to Create a Facebook Account on iPhone App
How To

How to Fix Facebook Confirmation Email Not Received

2 months ago
How to Create a Facebook Account on iPhone App
How To

How to Fix Facebook Confirmation Code Not Received

2 months ago
How to Create a Facebook Account on iPhone App
How To

How to Confirm Your Facebook Email or Phone Number

2 months ago
How to Create a Facebook Account on iPhone App
How To

How to Understand Your Facebook Account and Profiles

2 months ago
How to Create a Facebook Account on iPhone App
How To

How to Fix Facebook Name Not Accepted

2 months ago
Load More
Next Post
How to Make a Drone

How to Make a Drone

How to Fly an Airplane

How to Fly an Airplane

ADVERTISEMENT

Who We Are

Nyongesa Sande

NyongesaSande.com is a digital news and media platform covering breaking news, business, technology, AI, politics, sports, world affairs and African innovation.

News Sections

  • News
    • World
    • Africa
  • Politics
  • Business
  • Tech
  • AI
  • Telecom
  • Sports
  • Opinion
  • Lifestyle
  • Live
  • World Cup 2026
    • World Cup 2026 Standings
    • World Cup 2026

Editorial Standards

  • Editorial Policy
  • Fact Checking Policy
  • Corrections Policy
  • Ethics Policy
  • AI Usage Policy
  • News Tips
  • Submit Press Release

Legal

  • Privacy Policy
  • Terms of Use
  • Cookie Policy
  • Disclaimer
  • Risk Disclaimer
  • DMCA
  • Ad Choices

Our Company

  • About Us
    • Nyosake Designers
      • Nyosake Webmasters
      • Nyosake Investment
  • Contact Us
    • Newsroom Contact
  • Ownership Disclosure
  • Advertise
  • Privacy Policy
  • Terms of Use
  • Cookie Policy
  • Disclaimer
  • Risk Disclaimer
  • DMCA
  • Ad Choices

NyongesaSande.com is an independent digital news and media platform covering Africa, business, technology, AI, politics and global developments.

© 2026 NyongesaSande.com. All rights reserved.

No Result
View All Result
  • News
    • World
    • Africa
  • Politics
  • Business
  • Tech
  • AI
  • Telecom
  • Sports
  • Opinion
  • Lifestyle
  • Live
  • World Cup 2026
    • World Cup 2026 Standings
    • World Cup 2026

NyongesaSande.com is an independent digital news and media platform covering Africa, business, technology, AI, politics and global developments.

© 2026 NyongesaSande.com. All rights reserved.